top of page
The Knights of Ni Present: Fusion 360 Tutorials
Techniques for Creating Holes
Creating holes is an important part of our team's prototyping. Holes should be placed in the CAD models to denote to the onsite team where holes need to be drilled as well as to allow the 3D printing software to print the sidewalls of the holes, increasing structural integrity. To fully understand the importance and use of holes, watch this video.
Though this may seems to be a new technique, you have already partially learned now to make holes. In the last tutorial, you learned how to use the sketch and extrude tool, and by negatively extruding instead of positively extruding, you can make a hole.
To do this technique, first start a sketch on the surface you want the hole to be in.


Once you have completed the sketch of the hole you want to create, click the finish button to exit the sketch. Press the "E" key or select extrude from the create menu. Left Click on the face of your sketch. You will now be at the step shown below.

You will now be prompted with the Extrude dialogue. Either drag the arrow down or manually enter a negative value. This will make a hole in the object to the specified depth.

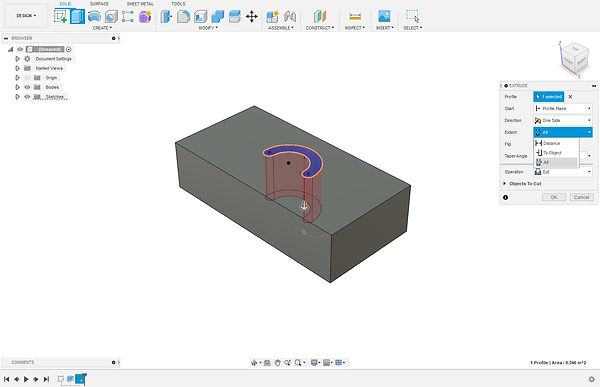
To let Fusion 360 automatically extend the hole until the other side of the object, navigate to the extrude dialogue and click the "extent" drop down menu. You will be prompted to select either "Distance", "To Object", or "All". Click on "All".
Press the "OK" button on the extrude dialogue, and the hole will have been created.

You now know how to make a hole using the extrude technique. This works well in cases where the incision or hole is not cylindrical, however, you will most likely want to use the hole tool for cylindrical holes or threads.
The hole tool works by selecting a point or points the hole(s) will be centered on. Begin the same way as the first method, with a sketch. Since I already have a sketch on the top face of my object, I am simply editing the pre-existing sketch.
Once in the sketch editing screen, navigate to the "create" drop down. Click on the "point" tool.

Left click on where you want the center of your holes to be. This will create points there.

Once you have placed the points, click finish sketch and press H to open up the hole tool. Left click on all of the points where you want to center the holes at. If the points are not visible, verify that you have enabled visibility on the sketch.

You will be faced with a dialogue to specify the attributes of the holes. The menu is somewhat self-explanatory, but it is worth mentioning that you have the same option for hole depth as you did using the previously covered method. You also should know that you can select from presets of screw thread types.

Congratulations! You have now learned the most common ways to make holes and incision. (I never said anything, but the second method is probably easier for creating certain holes on the first challenge)
bottom of page